Friday, July 14, 2017

Update....finally!!

Whew this week just got a little crazy after we last chatted on Monday!!  My car started acting up on my way in to work on Monday and I had to ask one of my BFF's to follow me home (on the back roads of course) to make sure that I didn't have any issues.
When we came to the stop light I received a text:  "Nice Hooptie".  I knew immediately what she meant and started to laugh hysterically.  Some of you may be too young or just didn't grow up with us but when we say hooptie it's not the best thing to happen.....when you don't intend for your car to look like it has hydraulics ;)  Ok, ok so it wasn't THAT bad but you get the point.  It was clearly obvious to all those around me that I was having a "slight" issue!!!


So Tuesday I hopped in my Jeep to head to work and made it half way and my Jeep started pulling and my low tire light popped on!  Sure enough my tire was losing air and quickly.  Sooooooo I turned around and again took to the back roads to make it home.  Yep I had a nail in my tire.  Not my week!!!  Blah, so I worked from home.

I believe I was meant to be home that day because our little fur baby, Zoey, needed an unexpected trip to the vet to have her poor tail looked at.  Not great news but holding out hope :-)  The vet had to sedate her in order to get a good look at her tail.  Here is Jake comforting her while she was sedated. She was still awake but completely still.  I think he was worried she was scared....


Have you ever had to hold a 100 lb german shepherd as her drugs were kicking in?  Wow we got our workout in that day at the vet!!!!

Anywho, enough of my excuses for why I've been a slacker.  Here is what we got done last Sunday on our landscape project!!


So what do you think?  We're making some serious progress, huh???  We cannot wait to get them in but it looks like we're shooting for the first week in August....maybe the second.  There is still a ton of prep work that needs to be done to be completely side walk ready but we're getting there.  CAN.NOT.WAIT.

Monday, July 10, 2017

Sidewalk Prep!

Happy Monday everybody!  The real bummer about this week is the fact that we actually have to work FIVE whole days.  I'm thinking I could really get on board with a THREE day work week.  Hey, a girl can dream can't she?

Onto our landscaping update.  First thing that needs to happen are the sidewalks.  Now mind you on Friday night I told my husband yeah let's start getting a plan together for our sidewalks and shoot for pouring them in August.

Well, when I got back from Adventure Saturday with my brother, my kids, my nieces and nephew, Ryan had already laid out the sidewalk.  Here is what I came home to....


Here is the front porch where our new steps will go!  Just found out that many places don't even make rounded concrete steps because of strict new guidelines.  Soooooo, that made my decision easy. Square steps it is!!


Here is where the sidewalk will go across the front of the garage and lead to the front porch....and Zoey my little photo-bomber.  The space close to the house will be where we pant the arborvitae and my pots filled with flowers.


This is on the left side of the house (if you're facing the front).  There won't be a sidewalk here but we're digging it out so we can't plant here.  We'll outline it with cottage stone.....yet to be determined.


I am soooooo excited.  I really think it is going to make a huge difference.  As many of you know, or some of you have figured, my husband does NOT waste any time once he focuses on a project.  Come back tomorrow and I'll show you what we got done on Sunday.  

Wednesday, July 5, 2017

Landscaping Time....Finally!!!

Well we are FINALLY getting moving on our landscaping and sidewalks....oh and some front porch steps.  #awkward #babysteps

We all know that it takes time and MONEY when it comes to landscaping.  Last summer our big project was the concrete in the barn and we're finally focusing on landscaping this year.  Don't let me fool you though, it popped to the top of the to-do list because we have a graduation party next year. #sayitaintso #cryingalready
Sometimes it just takes a little something, like a graduation party, to provide the incentive you need to get a project moving forward.

Obviously these pictures are from when we just finished the house but I forgot to take some pictures this weekend!!  You get the point......


The side walk will go across the front of the garage here on the right and lead to the (soon to be) front porch steps.


Clearly the front porch needs steps cuz that first step is a doozy!!!  We're on the fence about rounded steps or square steps.  I can't decide.  Ugghhh the struggle is real.  What do you think?????


Now onto the landscaping.  I'm thinking about arborvitae along the front of the house, with some ornamental grass and pots filled with bright colorful flowers.  We are going with black mulch this year and may decide on stone in the future.  However for now, I want black mulch.

I love the arborvitae in front of this house.


I love the purple in this fountain grass as well!


So that's where we're at right now.  Nope, I haven't finished the great room makeover and nope I haven't finished covering my dining room chairs and nope I haven't painted my mom's outside patio furniture.  I just keep adding more projects to the list cuz that is how I roll!!

Any plant/trees/bushes you love and recommend????


Monday, June 26, 2017

{DIY} Fireplace Log Holder

Happy, Happy Monday!!!!  Did that sound chipper?  I tried my hardest to sound all woohhhooo it's Monday again but man it's a real bummer that Monday is here already.  Oh well, moving on!

I decided to bust out my favorite spray paint this weekend and brighten up a little something in our great room.   I never realized how blah our log holder was that sits next to our fireplace.  Here is the before picture.


See, just kind of drab and boring, huh??  Don't get me wrong though, I do love it.  My FIL had it sitting in his barn and it had never been used.  He was nice enough to hand it over to me.

I took it out in the garage and got all of the dust off of it (awkward) and knocked off a few spots where there was flaking.


Once it was all cleaned up, I flipped it upside down and put in a large box I had in the garage to keep from getting too much over-spray.

 Here is the bottom all done.  I let it dry for 20 minutes and was ready to flip it over and finish up.


Here is the finished product.  All done and ready to dry.  Really I love this paint.  It really is forgiving and makes such a quick and cheap impact.  In case you can't read that tiny writing it is Gold Bright Metallic Finish from Krylon.

Here is the finished product back in the great room.  Love it!!


Huge difference, right????

Wednesday, June 21, 2017

My Martini Glass Obsession

I have a confession to make!  I'm addicted to martini glasses.  So, I agree, there are worse things to be addicted to but man I can't get enough.  Mostly because you can get them at the Dollar Tree for, well, a BUCK!!!  Sign me up.

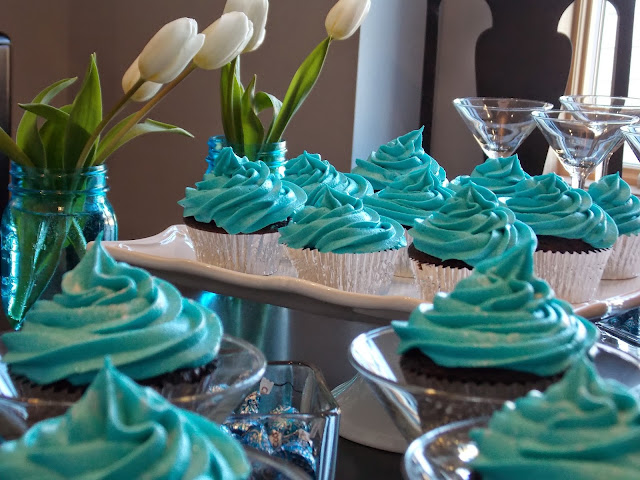
1.  Desserts.  I love to use them for desserts.  Here you'll see pictures from a baby shower where I used all of the smaller martini glasses I had to display all of the cupcakes I had made.  Sure I could have just used a cake plate but isn't this MUCH cuter?  I think so.
I've also made individual trifles in martini glasses.  They are quick, easy and make you look like Martha freaking Stewart.


2.  Mashtini Bar.  OMG this was sooooooo good.  I decided to put together a mashtini bar for bunco night at my house.  Not only was it adorable but it was so easy.  I made a huge pot of mashed potatoes and kept them warm in the crockpot til party time.  Then once it was time, I placed all of the toppings (bacon, green onions, fried onion straws, salsa, butter, gravy, sour cream and whatever else you might want) in those cute little glass bowls from the dollar tree.  Once it was time to eat, everyone grabbed their large martini glass and loaded is up with their mashed potatoes.  Then they made their way through the bar with the fixins.


3.  Table Decor.  The possibilities are endless when it comes to table decor.  I love using them at Thanksgiving and Christmas.  Here are some pics of the Thanksgiving table that I put together at my mom and dad's house several years ago.  Again, quick, cheap and easy.  For the pictures below all you need is some water, fresh cranberries and tea lights.
You can also use the bigger martini glasses and add whichever flowers and greenery are you faves. Hey, you could even add your favorite floral arrangement and stack on top of wood slice centerpieces. Come on, you know I love wood slices ;-)


4.  Martini Bar.  Duh!!  Seems to be pretty obvious, huh?  Grab your favorite booze and get creative. We've made pomegranate martinis, apple martinis.....you get the idea.  Man I could go for a martini right about now....


There you have it.  There are just a FEW ideas that show how I've used my martini glasses.  Have you used martini glasses in a creative way?  Share some pics!!


Tuesday, June 20, 2017

{Update} Great Room Makeover

Ok, ok so since I am as predictable as the day is long I couldn't wait any longer and had to show you what's happening in the great room.  Ok, well not a TON has been happening but I couldn't wait to show you THIS.....


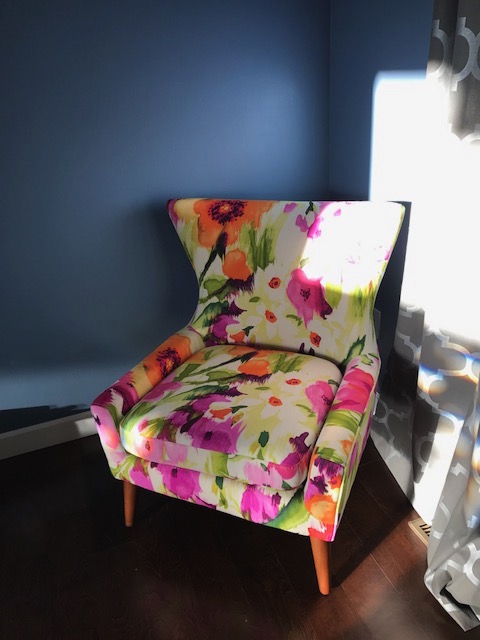
I found this at World Market last week marked down to $129.00 (originally $349.99) and it had all of the colors that I was looking for.  


I had originally planned to go with plain blush colored chairs but couldn't pass up this deal!  They only had one in stock so my second one had to be ordered and should hopefully be here by next weekend.  They were the perfect scale for that corner and will make a perfect little seating area next to the fireplace.


I even love the legs on these.  They are very mid-century modern and that is one of the many things I loved about these chairs.  


Here is the fabric that I will be ordering to make pillows for the couch.  Now I know this is a LOT of color and pattern and may not be everyone's cup of tea but I am sooooooo excited.


Here is a look at the Lulu Leopard fabric on the couch where the pillows will go! 


I also plan to get this Secret Gate, Blossom fabric for coordinating pillows on the couch.


Finally I'd like to throw in a couple blush faux fur pillows to finish off the couches.  I'm not exactly sure how the blush pillow will look with the secret gate blossom so something may change.....
As you can see most of this stuff is pretty pricey so I'm sure I'll be taking my sweet old time waiting for things to (hopefully) go on sale!!

Rest assured, I'm going with solid curtains ;)

Monday, June 19, 2017

Delicious Dessert Bars

I had to make dessert bars for a golf outing this past weekend and thought I'd try something new.  I don't usually like to make something that I've never made before and serve it to a bunch of people, but I thought eh, I'll live on the edge this time.  #rebel

I took to the interweb to find a recipe and stumbled across a recipe that sounded so divine that I couldn't resist.  One one of my favorite blogs for recipes is Mix and Match Mama.  I've made so many of her recipes and am NEVER disappointed.  So go on over to find her amazing and simple recipe for Peanut Butter Cup S'mores .  I made my family the guinea pigs and was given the thumbs up to serve them at the golf outing ;)  #whew


Such simple and cheap ingredients!!


However, let me tell you, that this part was a little stressful.  Well stressful might be extreme but I was starting to get nervous.  You use the boxed cake mix but you don't put in the water that the cake recipe calls for.  Soooooo, it is much thicker and SUPER sticky.  I finally used my noggin' and sprayed a little non-cooking spray on the spatula and was able to smooth it out MUCH easier.


Once you've got it spread out you add in the peanut butter cups.  I used a slightly different sized pan so I had to break some of the peanut butter cups apart (nope I wasn't just snacking on each of those before I added them).


Wowza, the marshmallow fluff was pretty sticky too but I got 'er done!  I was a sticky mess....


Then you add the 1/3 remaining cake batter.  The recipe says to drop in dollops and it will spread out as it cooks.  I was too afraid so I use the spatula with the cooking spray to smooth it out the best I could.


Hold onto your shorts, because the marshmallow fluff is REALLY gonna fluff.  I was watching anxiously hoping not to have a spill over into the oven.  Whew, I did not!!!


Annnnnnddddd here is the finished product.  Soooooooo stinkin' good.

Friday, June 16, 2017

Finished Breakfast Nook!

Do y'all remember almost exactly a year ago when I wrote this post talking about how bad I wanted a banquette for my breakfast nook?  No?  I don't blame you....that was a long time ago!!  Anywho, I finally got that banquette not TOO long after that post but then I started slacking again and never shared it with you.

Sooooo, I'm here to share my breakfast nook with you.  We don't use it as much as we should and I think I need to change that.  It really is cozy, looks out on to the veranda and would be the perfect spot to sip coffee when it's too chilly to sit outside.

I promise I'll stop talking and get to the pictures**.  Here you go!
**I took them with my phone so they are a tad bit dark.....


Yes I do still have ornaments hanging from my light.  Mostly because I love then and secondly because I haven't been able to get them untied ;)


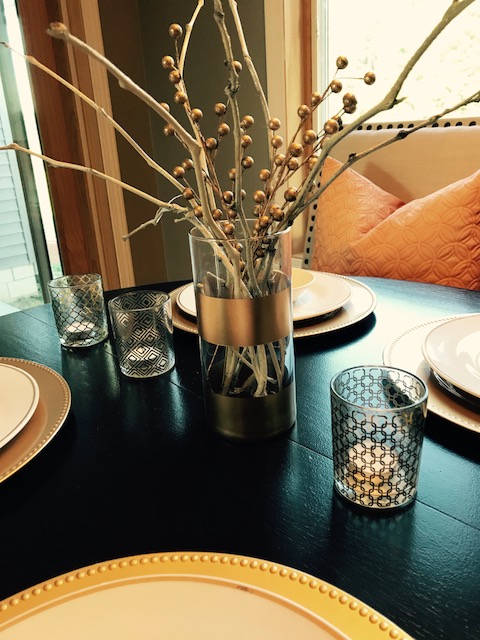
That is a vase from the Dollar Tree that I painted with gold stripes using Krylon paint.  You can find out how to paint your own vases here.


The gold charger and the plate with the gold ring around the outside are both from the Dollar Tree. They are usually very easy to find around the holidays and add a little bling to your table year round. Those adorable little bowls were from my grandma and make me smile every time I look at them.


Don't you just love the banquette??  It fit the space perfectly and most importantly didn't break the bank.


I ordered the banquette from Wayfair and it qualified for free shipping and arrived in two days.  You can find a similar banquette here.


These geometric candle holders are also from the Dollar Tree and look amazing at night when they are lit up.  Let's be honest, I like to spray paint anything that will sit still long enough but there is NO WAY that I could ever paint anything like that.  Well worth the $1.00 each.


There you have it.  It only took me 11 months to share it with you.  Whew, gotta work on that ;)